How do you reset a Goodman?
Is your Goodman unit giving you trouble? Don’t worry, we’ve got you covered! In this step-by-step guide, we’ll show you exactly how to reset your Goodman unit and get it up and running again in no time.
Step 1: Turn off the Unit
Make sure the unit is turned off. Locate the power switch, usually located near the unit or on the circuit breaker panel, and switch it off.
Step 2: Wait for 5 Minutes
Give the unit a few minutes to reset. This will allow any internal components to discharge and reset.
Step 3: Turn on the Unit
After waiting for 5 minutes, switch the unit back on. You can do this by flipping the power switch or turning on the circuit breaker.
Step 4: Check for Normal Operation
Observe the unit for any signs of normal operation. You should hear the unit start up and feel cool air blowing from the vents.
If your Goodman unit is still not functioning properly after following these steps, it may be time to call a professional technician to diagnose and fix the issue.
With our easy-to-follow guide, resetting your Goodman unit is a breeze. So don’t let a malfunctioning unit get you down, follow our instructions and enjoy the comfort of a properly working system!
Step 1: Turn off the Power
Before proceeding with resetting your Goodman unit, it is important to ensure your safety by turning off the power. To do this, locate the circuit breaker or the disconnect switch that controls your air conditioning system and turn it off. This step is crucial to avoid any potential electrical hazards.
Warning: Never attempt to reset your Goodman unit without first turning off the power. Failure to do so could result in serious injury or damage to your unit.
Once you have successfully turned off the power, you can proceed to the next step of the reset process.
Step 2: Locate the Reset Button
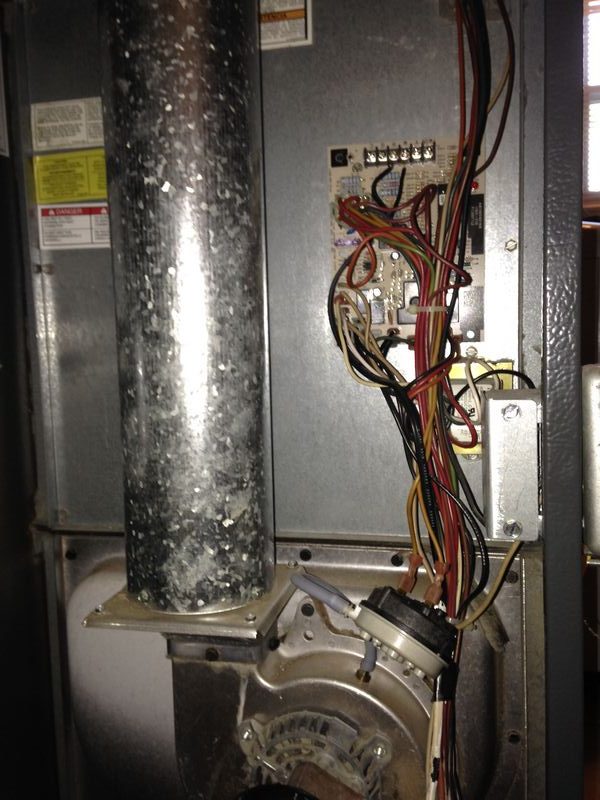
After turning off your Goodman unit, the next step is to locate the reset button. The reset button is a small, usually red or black, button that is typically located near the control board of the unit. It may be labeled with the word “reset” or have a small icon of a power symbol.
To find the reset button, you may need to remove the access panel or cover of the unit. Refer to the user manual or documentation for your specific Goodman unit if you are unsure of its location. Once the access panel is removed, visually inspect the control board and look for the reset button.
|
Note: |
Do not press the reset button without first turning off the power to the unit. Pressing the reset button while the power is still on may cause electrical shock or damage to the unit. |
Once you have located the reset button, make sure the power to the unit is turned off. This can be done by switching off the circuit breaker or disconnecting the unit from its power source.
When the power is off, press and hold the reset button for at least 10 seconds. This will allow the unit to reset and clear any error codes or malfunctions that may be causing it to malfunction.
After the reset button has been held for the appropriate amount of time, release it and wait a few moments. Then, turn the power back on to the unit.
Your Goodman unit should now be reset and ready to use. If the issue persists or if you are unsure of any step, it is recommended to contact a professional HVAC technician for assistance.
Step 3: Press and Hold the Reset Button
Once you have located the reset button on your Goodman unit, proceed to step 3. This step is crucial to resetting your unit and should not be overlooked.
Take a moment to ensure that the unit is turned off, and then locate the reset button. The reset button is typically found near the control board or on the front panel of the unit.
Gently press and hold the reset button for approximately 10 seconds. Make sure to apply a steady amount of pressure as you do this. You may feel a slight click or hear a soft sound, indicating that the reset button has been successfully pressed.
By pressing and holding the reset button, you are initiating the reset process for your Goodman unit. This will clear any error codes or issues that may be causing your unit to malfunction.
After holding the reset button for the specified amount of time, release it. You have successfully completed step 3 of the resetting process.
Proceed to the next step in the guide to continue resetting your Goodman unit and restoring it to its optimal functioning state.
Step 4: Wait for the Unit to Reset
After completing the previous steps to reset your Goodman unit, it’s important to wait for the unit to reset fully before proceeding. This may take a few minutes, so be patient.
While the unit is resetting, avoid any further attempts to adjust the settings or make changes. It’s crucial to allow the unit to go through the complete reset process in order for it to function properly.
During this waiting period, you might notice that the unit shuts off or remains inactive. This is normal and part of the reset process. It’s essential to resist the urge to try to turn the unit back on or make any further adjustments until the reset is complete.
Waiting for the unit to reset ensures that all settings and configurations are restored to their default values. It also allows the unit to recalibrate and stabilize, which will optimize its performance.
Once the reset is complete, you can then proceed to power on the unit and make any necessary adjustments to the settings or temperature controls.
Important: If the unit does not reset or continues to experience issues after the waiting period, it’s recommended to contact a qualified technician for further assistance. Attempting to troubleshoot or repair the unit without proper knowledge and experience may cause more harm than good.
Remember, waiting for the unit to reset completely is an important step in the process. Take a break, grab a cup of coffee, and let the unit do its thing!
Step 5: Turn on the Power
After completing the previous steps and ensuring that all connections are secure, it is now time to turn on the power to your Goodman unit.
Locate the power switch or circuit breaker for your unit and ensure it is in the “Off” position. If it is already in the “Off” position, proceed to the next step.
Using caution, flip the power switch to the “On” position or reset the circuit breaker. You should hear a click or see a light indicating that the power is now flowing to your Goodman unit.
Wait a few moments for the unit to power on and begin its startup sequence. You may hear the sound of the system coming to life and feel air flowing from the vents.
Once the unit has powered on and is running smoothly, you can proceed to adjust any settings or controls as needed.
Remember to exercise caution when working with electricity and always follow the manufacturer’s instructions for your specific Goodman unit. If you encounter any issues or have any concerns, it is recommended to contact a certified technician for assistance.
Step 6: Check the Unit
Once you have successfully reset your Goodman unit, it is important to check the unit to ensure that it is functioning properly. Here are a few key points to consider when checking your Goodman unit:
| 1. Air Flow: | Check if the air flow from the unit is consistent and strong. If the air flow is weak or uneven, it may indicate a problem with the unit. |
| 2. Temperature: | Monitor the temperature of the air coming out of the unit. It should be cool and consistent. If the temperature is too hot or fluctuating, there may be an issue that needs to be addressed. |
| 3. Strange Noises: | Listen for any unusual noises coming from the unit. If you hear banging, squealing, or grinding sounds, there may be a mechanical problem that requires attention. |
| 4. Leaks: | Inspect the unit for any signs of leaks. This includes checking for water or refrigerant leaks. Leaks can indicate a problem with the unit’s components and should be addressed promptly. |
| 5. Thermostat: | Ensure that the thermostat is set correctly and accurately controlling the unit. Adjust the settings as needed and observe if the unit responds accordingly. |
By thoroughly checking your Goodman unit after resetting it, you can catch any potential issues early on and prevent further damage. If you notice any problems or have concerns about the unit’s performance, it is recommended to contact a professional technician for assistance.
Step 7: Reset the Thermostat
Once you have successfully reset your Goodman unit, it is important to also reset the thermostat to ensure that everything is working correctly. Follow these steps to reset the thermostat:
1. Locate the thermostat on your wall and remove the cover.
2. Look for a small button labeled “Reset” or “Restart”. It is usually located on the bottom or side of the thermostat.
3. Press and hold the “Reset” or “Restart” button for about 5-10 seconds.
4. Release the button and wait for the thermostat to reboot.
5. Once the thermostat has rebooted, check if the display shows the correct temperature and settings.
6. If necessary, adjust the temperature and settings to your desired preferences.
7. Replace the cover on the thermostat.
By resetting both your Goodman unit and thermostat, you can ensure that your HVAC system is operating efficiently and effectively. If you continue to experience issues with your unit, it may be necessary to contact a professional technician for further assistance.
Step 8: Test the Unit
After performing the necessary reset steps on your Goodman unit, it is important to test the unit to ensure it is functioning properly. Follow the steps below to test your Goodman unit:
- Turn on the power: Make sure the power to the unit is turned on at the circuit breaker or disconnect switch.
- Set the thermostat: Adjust the thermostat to your desired temperature.
- Check the airflow: Feel the airflow from the vents to ensure it is coming out strong and cool.
- Monitor the temperature: Keep an eye on the temperature in the room to see if it is cooling down to the desired level.
- Listen for unusual sounds: Pay attention to any strange or unusual sounds coming from the unit, such as knocking or buzzing noises.
- Observe any error codes: If your Goodman unit has an electronic control board, check for any error codes that might indicate a problem with the unit.
- Check for presence of cold air: Place your hand near the vents to feel if cold air is being properly distributed throughout the room.
- Repeat the process: If you notice any issues or have concerns about the unit’s performance, you may need to repeat the reset process or contact a professional technician for further assistance.
By following these steps, you can ensure that your Goodman unit is properly reset and functioning as it should. Regular maintenance and testing can help prevent future issues and prolong the lifespan of your unit.
Step 9: Check for Error Codes
After you have successfully reset your Goodman unit, it is important to check for any error codes that may be displayed. These error codes can provide valuable information about potential issues with your unit.
To check for error codes, follow these steps:
- Locate the control panel on your Goodman unit.
- Press the “Menu” or “Settings” button on the control panel.
- Navigate to the “Error Codes” or “Diagnostic Codes” section.
- Take note of any error codes that are displayed on the screen.
- Refer to the Goodman unit’s manual or contact a professional technician for assistance in interpreting the error codes.
Understanding the error codes can help you identify and resolve potential issues with your Goodman unit. It is important to address any error codes promptly to prevent further damage or malfunctions.
If you are unable to find the error codes or need assistance in interpreting them, it is recommended to contact a licensed professional technician who specializes in Goodman units for a thorough inspection and diagnosis.
Step 10: Contact a Professional
If you have followed all the previous steps and your Goodman unit is still not working properly, it may be time to contact a professional. Professional technicians have the expertise and knowledge to diagnose and fix any issues with your Goodman unit.
When contacting a professional, make sure to provide them with all the information you have gathered during the previous steps. This will help them understand the problem better and improve their ability to solve it quickly and efficiently.
It’s important to choose a reputable and experienced professional for your Goodman unit. Look for licensed technicians who have experience working with Goodman units specifically. You can ask for recommendations from friends or family, or search online for certified professionals in your area.
Remember, attempting to fix complex issues on your own can cause further damage to your unit and may void your warranty. By contacting a professional, you can ensure that your Goodman unit is properly diagnosed and repaired, restoring it to its optimal performance.
| Benefits of contacting a professional: |
| • Expertise and knowledge |
| • Proper diagnosis of the issue |
| • Efficient and effective repairs |
| • Avoid further damage to the unit |
| • Warranty protection |
Step 11: Clean or Replace Filters
One important aspect of maintaining your Goodman unit is keeping the filters clean and replacing them regularly. Dirty filters can hinder the performance of the unit and reduce its efficiency. Additionally, clogged filters can lead to poor indoor air quality, causing health issues for you and your family.
To clean the filters, follow these steps:
- Turn off the unit and unplug it from the power source.
- Locate the filter panel on your Goodman unit.
- Open the filter panel by removing the screws or clips that hold it in place.
- Take out the dirty filters.
- Inspect the filters for any damage or excessive dirt buildup. If the filters are damaged, replace them with new ones.
- Use a vacuum cleaner or a soft brush to gently clean the filters. Make sure to remove all the dust and debris.
- If the filters are very dirty or damaged beyond repair, it’s recommended to replace them with new, compatible filters.
- Insert the cleaned or new filters back into the filter panel.
- Secure the filter panel by fastening the screws or clips.
- Plug the unit back into the power source and turn it on.
- Regularly check and clean or replace the filters every 1-2 months, or as recommended by the manufacturer, to ensure optimal performance and indoor air quality.
By keeping your Goodman unit’s filters clean and replacing them as needed, you can extend the lifespan of your unit and maintain a healthy and comfortable indoor environment.
Step 12: Perform Regular Maintenance
Regular maintenance is essential for keeping your Goodman unit running smoothly and efficiently. By following these simple steps, you can prolong the lifespan of your unit and avoid costly repairs.
1. Replace Filters
One of the most important maintenance tasks is to regularly replace the air filters. This should be done every 1-3 months, depending on the level of usage and the quality of the air in your area. Clean filters will ensure that your unit is operating at peak performance and prevent dust and debris from entering the system.
2. Clean the Condenser Coil
The condenser coil is located outside and can become dirty with debris, leaves, and other outdoor elements. It’s important to clean the coil at least once a year to remove any dirt or buildup that could hinder airflow. A clean condenser coil will allow your unit to cool more efficiently and help prevent potential breakdowns.
3. Check the Condensate Drain Line
The condensate drain line is responsible for removing excess moisture from your unit. Over time, this line can become clogged with algae, mold, or other debris, which can lead to water leaks and damage. Regularly check and clean the drain line to ensure proper drainage.
4. Inspect Electrical Connections
Loose or faulty electrical connections can not only affect the performance of your unit but also pose a safety risk. Inspect all electrical connections and tighten or repair them as needed. It’s also a good idea to check for any signs of damage or fraying in the wiring.
5. Lubricate Moving Parts
Regularly lubricating the moving parts of your Goodman unit, such as the fan motor and bearings, can help reduce friction and extend their lifespan. Be sure to use the recommended lubricant and follow the manufacturer’s instructions.
6. Check Refrigerant Levels
Proper refrigerant levels are crucial for the efficient operation of your unit. Low refrigerant levels can lead to decreased cooling capacity and increased energy consumption. Regularly check the refrigerant levels and consult a professional if you suspect a leak or other issues.
7. Schedule Professional Maintenance
While there are many maintenance tasks that you can do yourself, it’s also important to schedule professional maintenance at least once a year. A qualified technician can thoroughly inspect your unit, identify any potential issues, and perform necessary repairs or adjustments.
By performing regular maintenance on your Goodman unit, you can ensure its optimal performance, prolong its lifespan, and enjoy reliable cooling and heating throughout the year.
Step 13: Keep the Unit Clear
Keeping your Goodman unit clear of debris and obstructions is essential for optimal performance and longevity.
To ensure proper airflow and prevent any potential damage, follow these steps:
|
1. Remove any leaves, branches, or other debris that may have accumulated around the unit. |
|
2. Trim any nearby vegetation, such as bushes or shrubs, to maintain a clear space of at least 2 feet around the unit. |
|
3. Keep the area around the unit clean and free of clutter. Avoid storing items or placing furniture too close to the unit. |
|
4. Regularly check the unit’s vents and coils for any dirt or debris. Use a soft brush or vacuum cleaner to gently clean them if necessary. |
|
5. Ensure that there are no obstructions blocking the unit’s intake or exhaust vents. |
|
By keeping your Goodman unit clear and free from obstructions, you can help prevent potential issues and ensure it operates efficiently for years to come. |
Q&A:
Where can I find the reset button on my Goodman unit?
The reset button on a Goodman unit is usually located near the control board. However, the exact location may vary depending on the specific model of your unit. It is best to consult the user manual or contact a professional technician for assistance in locating the reset button.
How long do I need to hold the reset button for?
When resetting a Goodman unit, you generally need to hold the reset button for about 5 seconds. This duration may vary depending on the model of the unit, so it is advisable to consult the user manual or contact a professional technician for specific instructions.
What should I do if my Goodman unit does not reset after following the steps?
If your Goodman unit does not reset after following the steps outlined in the guide, there may be an underlying issue that requires professional assistance. It is recommended to contact a qualified technician who specializes in Goodman units to diagnose and resolve the problem.
Can I reset my Goodman unit without turning off the power?
No, it is not recommended to reset your Goodman unit without turning off the power. Resetting the unit while it is still powered on can potentially cause further damage or electrical hazards. Always turn off the power to your unit before attempting to reset it, and follow the proper safety precautions.
What is the Step-by-Step Guide: How to Reset a Goodman Unit?
The Step-by-Step Guide: How to Reset a Goodman Unit is a detailed guide that provides instructions on how to reset a Goodman unit in case of a malfunction or error message.


